 NeuroDynamic
The steps
Check the SSH client is there
Windows includes it, but it's worth confirming.
Run this in PowerShell or Windows Terminal.
ssh -V
Create a key
Your PC's own key, protected by a passphrase.
Before copying, replace YOUR-PC-NAME with a label for this PC (for example, sam-laptop). Use a dedicated filename so an existing key stays safe. The command checks for an existing key before creating one. If either file already exists, stop and choose another filename, then use that same name throughout this guide. When prompted, choose a passphrase; do not overwrite an existing key.
New-Item -ItemType Directory -Force "$env:USERPROFILE\.ssh" | Out-Null
$key = "$env:USERPROFILE\.ssh\id_ed25519_homeserver"
if ((Test-Path $key) -or (Test-Path "$key.pub")) { throw "Key already exists. Choose a different filename before continuing." } else { ssh-keygen -t ed25519 -f $key -C "YOUR-PC-NAME" }Copy the public key to the server
The server will then recognise your PC.
Replace YOUR-USERNAME and YOUR-SERVER-IP with your own values before copying. Before your first connection, obtain the server’s SSH host-key fingerprint through a trusted route, such as its local console or your administrator. Compare it with the SSH prompt before accepting. Do not accept an unfamiliar or changed host key just to continue. You may then be asked for your server password to install the public key. If password login is disabled, install the public key through an existing authorised session or ask the server administrator to add it.
Get-Content "$env:USERPROFILE\.ssh\id_ed25519_homeserver.pub" | ssh YOUR-USERNAME@YOUR-SERVER-IP "mkdir -p ~/.ssh && chmod 700 ~/.ssh && cat >> ~/.ssh/authorized_keys && chmod 600 ~/.ssh/authorized_keys"
Optional: remember the passphrase with the SSH agent
So the agent can remember your key’s passphrase for subsequent connections.
Key login from step 3 should already work. Note the ssh-agent service’s original startup setting before changing it. Use the two separate windows below; do not run ssh-add as another administrator account. Agent availability and key retention can vary; check after signing in again.
Open PowerShell as administrator for these service commands. Close this administrator window afterwards.
Get-Service ssh-agent | Set-Service -StartupType Automatic
Start-Service ssh-agent
Return to your normal PowerShell window to add your key. Enter the key’s passphrase when asked.
ssh-add "$env:USERPROFILE\.ssh\id_ed25519_homeserver"
Optional: add a shortcut name
ssh homeserver is easier to type than an address.
In normal PowerShell, open notepad $env:USERPROFILE\.ssh\config. Replace YOUR-SERVER-IP and YOUR-USERNAME below. Add this Host block to your existing config, preserving other entries. If homeserver already exists, choose another alias and use it in step 6. In Notepad’s Save dialog choose All files so the file has no .txt ending.
Host homeserver
    HostName YOUR-SERVER-IP
    User YOUR-USERNAME
    IdentityFile ~/.ssh/id_ed25519_homeserver
IdentitiesOnly yesOptional: add a Windows Terminal profile
One click from the tab menu.
Once ssh homeserver works in step 5, give it a menu entry. Follow each action below; the videos are optional. Use your own alias if you changed it.
1. Open profile settings
Open Windows Terminal Settings, then choose Add a new profile.
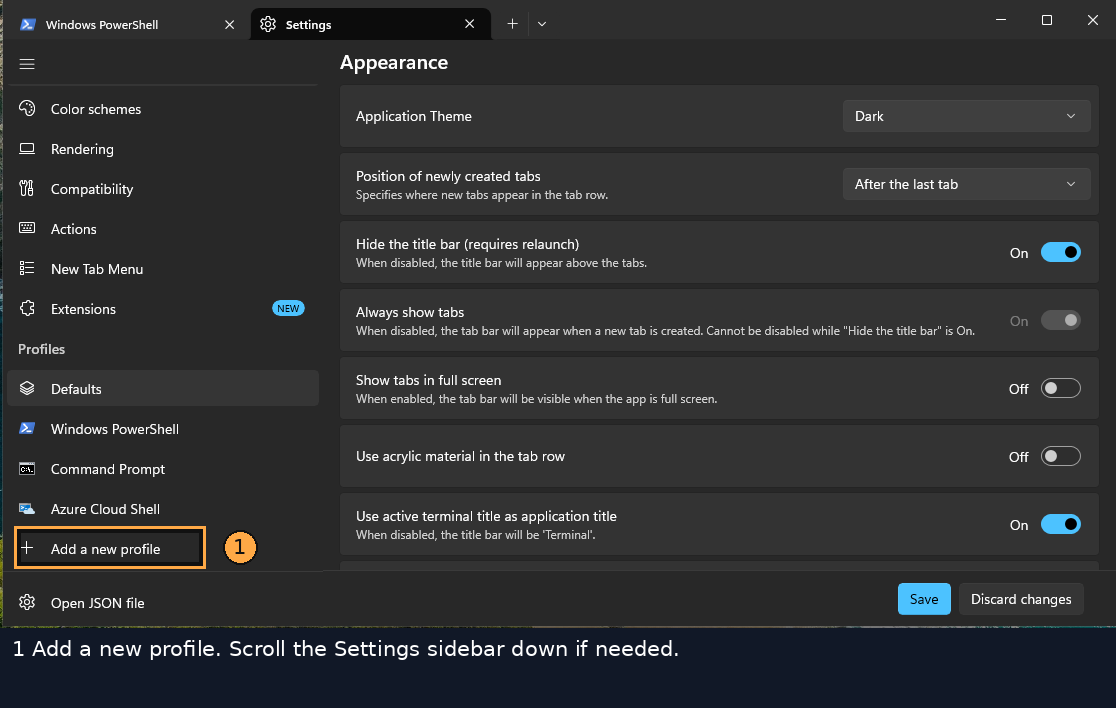
2. Create an empty profile
Choose New empty profile. You should see the new profile’s settings.
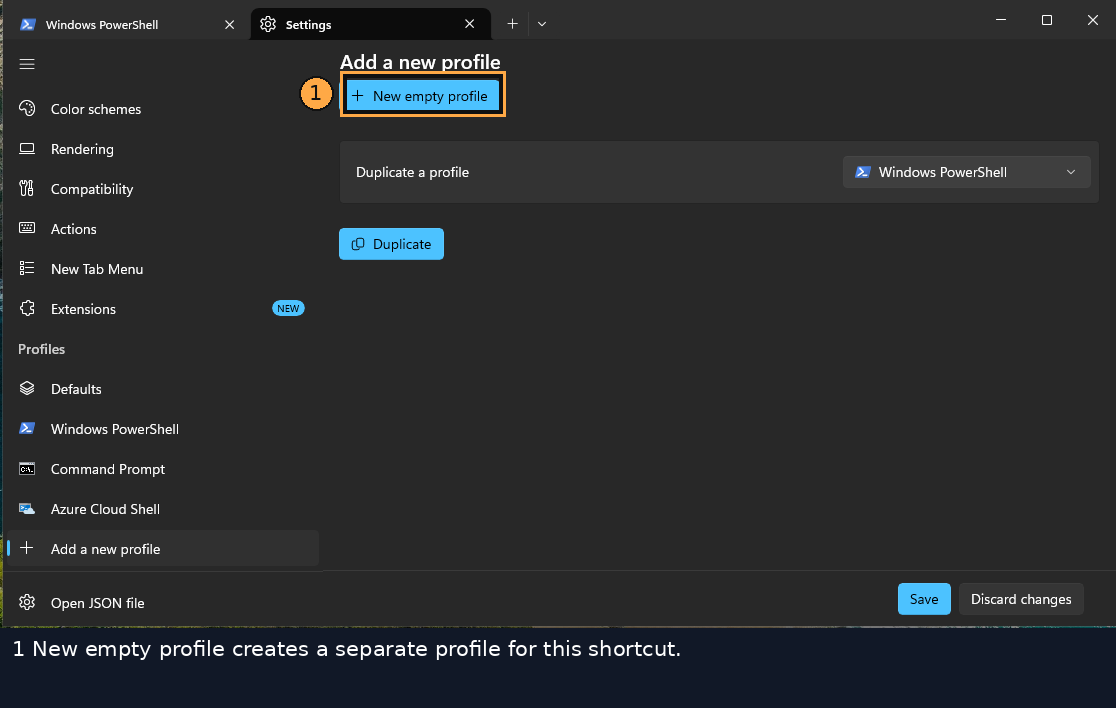
Watch: Create the empty profile · 13 seconds (optional)
Open Settings, select Add a new profile, then choose New empty profile.
Open video full-size (new tab)3. Name it and set the command
Enter a recognisable Name and set Command line to ssh homeserver. Use your own working alias from step 5.
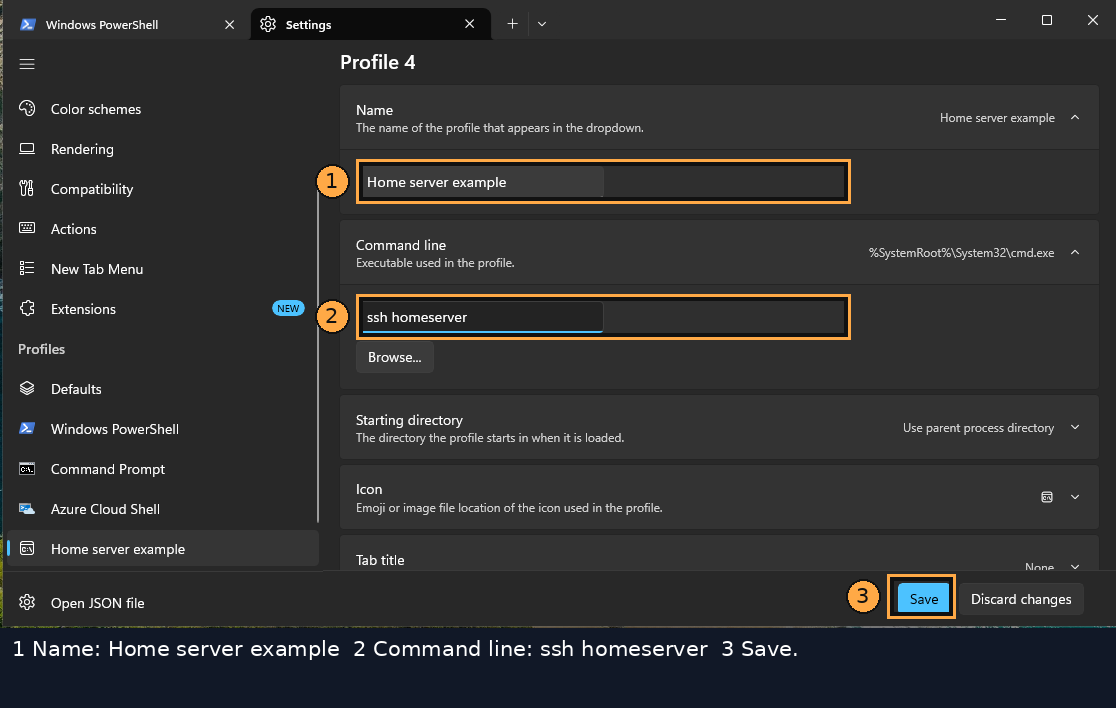
Watch: Name the profile · 14 seconds (optional)
This clip shows the menu name being entered. Set Command line to your working SSH alias using the text and picture above; that edit is shown at the start of the next clip.
Open video full-size (new tab)4. Save and find your profile
Select Save, return to Terminal and open the new-tab menu. Check your profile is listed; choose it to try your own connection.
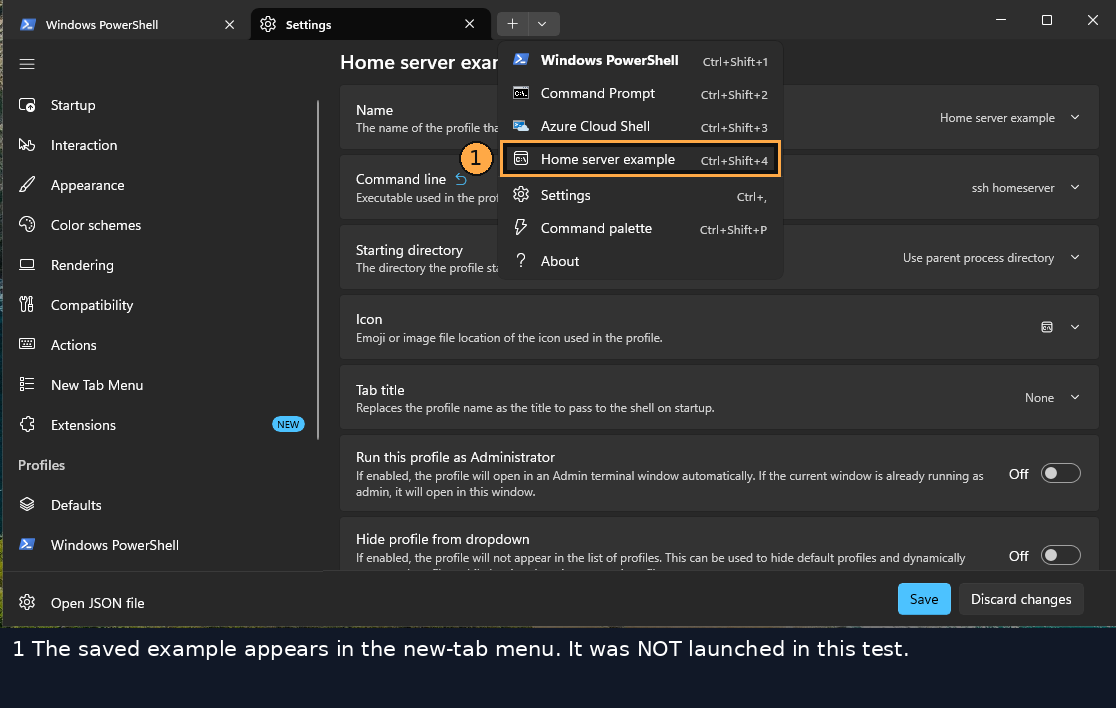
Watch: Save and find the profile · 25 seconds (optional)
Save the profile, return to Terminal and open the new-tab menu to find Home server example. The lab stops at the menu; it does not connect to a server.
Open video full-size (new tab)Something went wrong?
'Permission denied (publickey)'
Check step 3 installed the complete line from id_ed25519_homeserver.pub. Match the full public key, not just the YOUR-PC-NAME comment. Confirm the username, IdentityFile and server-side permissions; never copy your private key to the server.
'Bad owner or permissions' on the config file
The file must belong to you only. Recreate it in your own folder rather than copying it from elsewhere.
Undo all of this
Remove only the Windows Terminal profile and Host block you added. If retiring this key, identify its exact full public-key line on the server and remove only that line from ~/.ssh/authorized_keys, preserving all other keys. Remove it from the Windows agent with ssh-add -d "$env:USERPROFILE\.ssh\id_ed25519_homeserver". Only if it is no longer used anywhere, delete the two id_ed25519_homeserver files you created. Keep the rest of .ssh. If you changed the agent service startup setting, restore the original setting when appropriate for your other keys.